
A Step-by-Step Guide
QuickBooks Desktop is a robust accounting software that can handle the financial needs of a law firm, including managing client trust accounts. Proper setup and consistent data entry are crucial for its effective use. This tutorial will guide you through the process of setting up a company file in QuickBooks Desktop, which is the first step to managing your law firm’s accounting.
Step 1: Launch QuickBooks Desktop
- Locate QuickBooks Desktop: Double-click the QuickBooks Desktop icon on your computer desktop or navigate through the programs file to find it.
- Open the Program: Once located, double-click to open QuickBooks Desktop.

Step 2: Create a New Company File
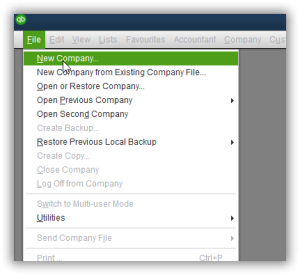
- Click on File: In the QuickBooks menu, click on the “File” option.
- Select New Company: From the dropdown menu, select “New Company.”
Step 3: Set Up Your Company
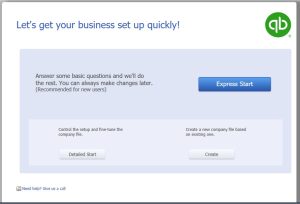
- Get Your Business Set Up Quickly Window: This window presents four options for creating your company file:
- Express Start: Quick setup with basic questions.
- Detailed Start: Comprehensive setup with an interview process (this is the option we’ll use).
- Create from an Existing Company File: Useful if converting from another QuickBooks file.
- Convert from Another Accounting Software: For users switching from other accounting software.
Using Detailed Start
- Select Detailed Start: Click on “Detailed Start” to begin the easy step interview process.
Step 4: Easy Step Interview
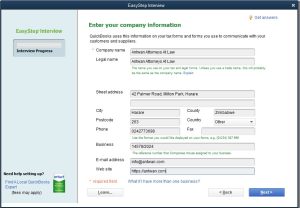
- Company Information: Enter the following details:
- Company Name: Enter your law firm’s name (e.g. Antwan Attorneys At Law).
- Legal Name: If different from the company name, enter the legal name. If the same, repeat the company name.
- Street Address: Input your firm’s address (e.g., 42 Palmer Road, Milton Park, Harare).
- City, Zip Code, Country: Provide location details.
- Phone Number: Enter your firm’s contact number.
- Email and Website Address: Input if available.
- Click Next: Proceed to the next step.
Step 5: Select Your Industry
- Industry Selection: Choose “Legal Services” from the list provided.
- Click Next: Continue to the next step.

Step 6: Company Organization
- Choose Business Structure: Select the appropriate option (e.g., Sole Proprietorship, Partnership, LLC, Corporation).
- Click Next: Move to the next step.

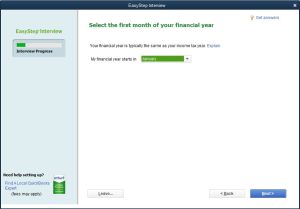
Step 7: Fiscal Year Setup
- Select First Month of Fiscal Year: For Zimbabwe, the fiscal year typically runs from January to December. Select January.
- Click Next: Continue.
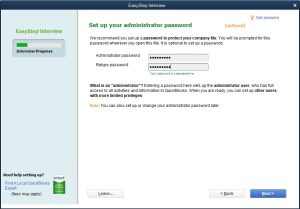
Step 8: Set Up Administrator Password
- Enter Password: Create an administrator password for security.
- Retype Password: Confirm the password.
- Click Next: Proceed to the next step.
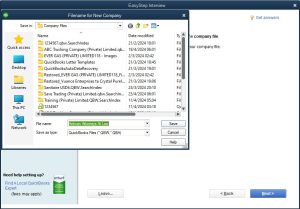
Step 9: Create Your Company File
- Create Company File: Click “Next” to begin creating your company file.
- Save File: Choose a location to save your company file and click “Save.”
Step 10: Customize QuickBooks for Your Business
- Customize QuickBooks Window: Click “Next” to start customizing QuickBooks.
- Answer Business-Specific Questions: Enable features that suit your law firm’s needs by answering the following questions:
- Business Type: Select “Services Only” since it’s a law firm.
- VAT or Sales Tax: Select “Yes” if registered for sales tax.
- Estimates/Quotations: Choose “Yes” if you create estimates.
- Billing Statements: Choose “Yes” to send billing statements to clients.
- Progress Invoicing: Select “No” (mostly used by contractors).
- Manage Bills: Select “Yes” if you manage bills.
- Track Time: Select “Yes” to track time spent on client projects.
- Employees: Select “No” if not using the payroll module in QuickBooks.
- Chart of Accounts Setup: Click “Next” to set up your chart of accounts.
Step 11: Set Tracking Start Date
- Select Start Date: Choose the beginning of the fiscal year as the start date.
- Click Next: Proceed to the next step.
Step 12: Chart of Accounts
- Tick Relevant Accounts: Review and select the necessary accounts for your law firm.
- Click Next: Continue to the next step.
Step 13: Complete Setup
- Congratulations Window: You will see a message indicating the successful creation of your company file.
- Click Go to Setup: Proceed to the next window.
Step 14: Initial QuickBooks Customization
- Get All Details into QuickBooks: Options to add customers, suppliers, products/services, and bank accounts will appear.
- Click Start Working: You can add these details later.
Final Step: Ready to Use QuickBooks
- Begin Using QuickBooks: You are now ready to manage your law firm’s accounting in QuickBooks Desktop.
By following these steps, you will have a fully set up QuickBooks company file tailored to your law firm’s specific needs. Consistent and accurate data entry will ensure that your firm’s financial activities are well-managed and easily accessible.
Properly setting up the law firm’s company file in QuickBooks Desktop is crucial for several reasons:
- Accurate Financial Tracking: A correctly configured company file ensures all financial transactions are accurately recorded, making it easier to track income, expenses, and overall financial health.
- Client Trust Account Management: Law firms often handle client trust accounts, which require meticulous tracking to ensure compliance with legal and ethical standards. Proper setup allows for accurate management of these funds.
- Compliance and Reporting: Accurate financial records are essential for tax reporting and compliance with legal requirements. Proper setup helps generate precise financial reports needed for audits, tax filings, and regulatory compliance.
- Efficient Operations: A well-organized company file streamlines daily operations, such as invoicing, billing, and managing accounts payable and receivable, which enhances productivity and reduces errors.
- Informed Decision-Making: Detailed financial data enables better decision-making regarding budgeting, forecasting, and strategic planning, contributing to the firm’s growth and stability.
- Customization: Tailoring the QuickBooks setup to the specific needs of a law firm, such as selecting the right chart of accounts and enabling relevant features, ensures the software meets the firm’s unique operational requirements.
By setting up the company file properly, a law firm can maintain accurate financial records, ensure compliance, and optimize its financial management processes.
