Deleting Inactive Inventory Items in Sage Pastel Partner

Deleting Inactive Inventory Items

Welcome to this lesson on how to delete inactive inventory items in Sage Pastel Partner. In this guide, you will learn how to remove inventory items that are no longer needed. Follow the steps below to complete this task.

Step-by-Step Instructions

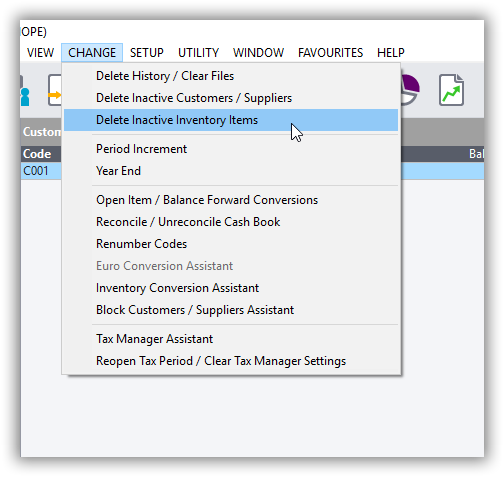
Step 1: Access the Delete Inactive Inventory Items Feature

  1. Click on “Change”:
    • Open Sage Pastel Partner.
    • Navigate to the menu and click on “Change”.
  2. Select “Delete Inactive Inventory Items”:
    • In the dropdown menu, select “Delete Inactive Inventory Items”.

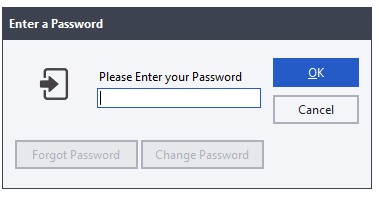
Step 2: Enter Password

  1. Enter the Password:
    • A prompt will appear asking for your password.
    • Enter your password in the provided field and click “OK” to continue.

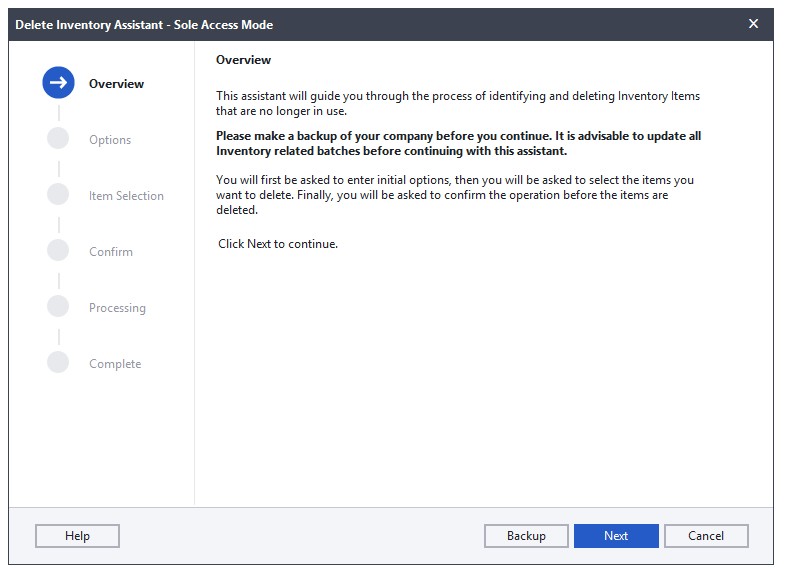
Step 3: Use the Delete Inventory Assistant

  1. Read the Notes:
    • You will be taken to the “Delete Inventory Assistant” window.
    • Carefully read through the notes provided on this screen.
  2. Click “Next”:
    • After reading the notes, click the “Next” button to proceed.

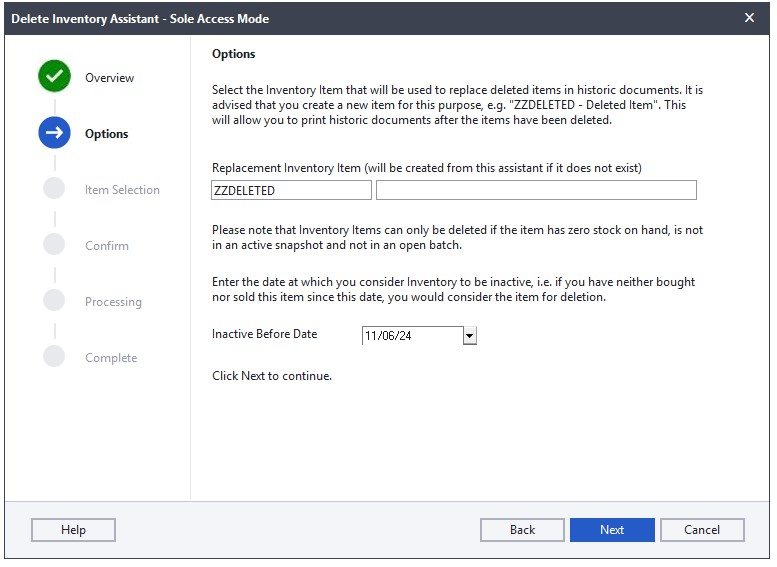
Step 4: Set the Inactive Before Date

  1. Read the Options Notes:
    • You will be taken to the “Options” window.
    • Read through the notes on this screen.
  2. Select the “Inactive Before” Date:
    • Choose the date before which the inventory items should be considered inactive.
  3. Click “Next”:
    • Once you have selected the date, click the “Next” button to continue.

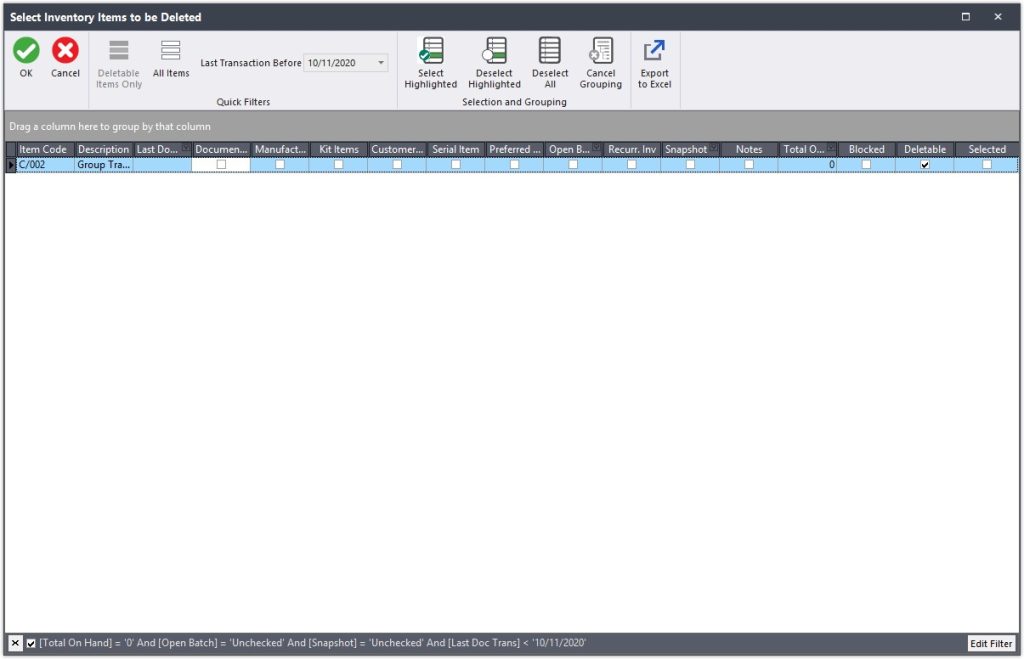
Step 5: Select Inventory Items to Delete

  1. Choose Inventory Items:
    • You will be taken to the “Select Inventory Items to be Deleted” window.
    • Tick the checkbox next to the inventory items you want to delete.
  2. Click “OK”:
    • After selecting the items, click “OK” to proceed.

Step 6: Confirm and Process the Deletion

  1. Read the Confirmation Notes:
    • You will be taken to the “Confirm” window.
    • Read through the notes carefully.
  2. Backup Confirmation:
    • Tick the checkbox to confirm that you have done a backup of your data.
  3. Click “Process”:
    • Click the “Process” button to complete the operation.

Step 7: Finish the Operation

  1. Allow the Operation to Run:
    • Allow the system to run the deletion operation.
  2. Click “Finish”:
    • Once the operation is complete, click the “Finish” button.

Completion

You have now successfully deleted inactive inventory items in Sage Pastel Partner.

Why Delete Inactive Inventory in Sage Pastel Partner?

Managing inventory efficiently is crucial for any business. Over time, inventory records can become cluttered with items that are no longer in use or relevant. Deleting inactive inventory items in a system like Sage Pastel Partner offers several benefits:

1. Improved System Performance

  • Faster Processing: Removing inactive items reduces the amount of data the system has to process, leading to quicker report generation and overall system responsiveness.
  • Reduced Clutter: A streamlined database with only active items makes it easier to navigate and manage inventory.

2. Accurate Inventory Management

  • Updated Inventory Data: Deleting items that are no longer in stock or no longer being sold ensures that inventory data is accurate and up-to-date.
  • Better Decision Making: Accurate data helps in making informed decisions about purchasing, stocking, and sales strategies.

3. Simplified Reporting

  • Relevant Reports: Reports generated from the system will reflect only active inventory items, making them more relevant and easier to interpret.
  • Efficiency in Audits: During audits, having a clean and current inventory list simplifies the process and reduces the chances of discrepancies.

4. Cost Savings

  • Storage Costs: Reducing the number of items in the system can lower data storage costs, especially for businesses with large inventories.
  • Maintenance Costs: A smaller, more manageable database reduces the time and effort required for system maintenance and backups.

5. Enhanced User Experience

  • Easier Searches: Users can find the items they need more quickly without having to sift through outdated or inactive entries.
  • Streamlined Workflows: With less clutter, employees can focus on current and actionable items, improving overall productivity.

6. Regulatory Compliance

  • Data Retention Policies: Some industries have regulations regarding the retention and deletion of data. Regularly deleting inactive items can help ensure compliance with these regulations.
  • Accurate Record Keeping: Maintaining an accurate inventory record is often a requirement for financial and tax reporting.

7. Inventory Optimization

  • Identify Trends: By removing inactive items, businesses can better analyze sales trends and identify which products are performing well.
  • Space Management: Physically, it helps in warehouse space management by focusing only on current and necessary stock.

Conclusion

Regularly deleting inactive inventory items in Sage Pastel Partner is a best practice that enhances system performance, improves inventory accuracy, and supports better business decisions. It ensures that your inventory management processes remain efficient and effective, ultimately contributing to the overall success of your business.

Processing a Bank Transfer Between Two Cash Books on Sage Pastel Partner

Processing a Bank Transfer Between Two Cash Books

Welcome to this detailed lesson on how to process a bank transfer between two cash books using Sage Pastel Partner. From time to time, you may need to transfer money from one bank account to another. Using the Cashbook Transfer Wizard, you can easily record transfers that take place between two bank accounts owned by the company. This is a three-stage process:

Stage 1: Creating the Inter-Bank Transfer Account

Stage 2: Setting Up the Inter-Bank Transfer Account

Stage 3: Processing the Transfers Between Banks

In this lesson, we will start with creating the inter-bank transfer account. Follow these steps carefully:

Stage 1: Creating the Inter-Bank Transfer Account

Step-by-Step Guide

  1. Open Sage Pastel Partner.
  2. Click on Edit in the main menu.
  3. Click on General Ledger.
  4. Click on Accounts.
  5. You will be taken to the Edit General Ledger Accounts window.

  1. Click on Add.
  2. Enter the Main Account Number.
    • This is a four-digit number decided by you. For this lesson, we will use 8450.
  3. The Sub Account defaults to 000.
  4. Enter the Account Description.
    • For this lesson, use Inter Bank Transfer Account.
  5. Click the Details tab.
  6. Under Main Account, select the Account Type.
    • Choose Balance Sheet.
  7. Under Balance Sheet Financial Category, select Bank.
  8. On Report Writer Category, select Bank.
  9. Click Save 

The system will prompt you if you want to create an additional cashbook-Click NO

Congratulations! You have successfully created the inter-bank transfer account. Next, we will move on to setting up the bank transfer account.

Stage 2: Setting Up the Inter-Bank Transfer Account

This part of the lesson will guide you through setting up the inter-bank transfer account, preparing it for use in processing bank transfers.

Step-by-Step Guide

  1. Open Sage Pastel Partner.
  2. Click on Edit in the main menu.
  3. Click on General Ledger.
  4. Click on Accounts.
  5. Locate the Inter Bank Transfer Account you just created.
  6. Configure the necessary settings for the account as per your company’s requirements.

Note: Detailed instructions for configuring the inter-bank transfer account can vary based on specific requirements and company policies. Ensure all necessary details are accurately filled in.

Stage 3: Processing the Transfers Between Banks

This final part of the lesson will show you how to process transfers between the banks using the Cashbook Transfer Wizard.

Step-by-Step Guide

  1. Open Sage Pastel Partner.
  2. Click on Cashbook.
  3. Click on Transfers.You will be taken to the Cashbook Transfer Wizard.
  4. Select the Source Bank Account.
  5. Select the Destination Bank Account.
  6. Enter the Amount to Transfer.
  7. Enter the Date of the Transfer.
  8. Provide any additional details or descriptions necessary for the transfer.
  9. Review the details and confirm the transfer.
  10. Click Process to complete the transfer.

Implications of Interbank Transfers

Interbank transfers, which involve moving funds from one bank account to another within the same organization, have significant implications for various aspects of financial management and accounting within a company. Understanding these implications is crucial for maintaining accurate financial records and ensuring smooth financial operations. Below, we explore the key implications of interbank transfers.

1. Accurate Financial Reporting

Implication: Properly recording interbank transfers ensures that financial statements accurately reflect the company’s financial position.

  • Balance Sheet Accuracy: Interbank transfers affect the balance sheet by changing the cash balances of the involved bank accounts without affecting the overall cash balance of the company. Accurate recording prevents discrepancies and ensures that the total cash position is correctly reported.
  • Audit Trails: Accurate records provide clear audit trails, making it easier for auditors to verify transactions and for the company to comply with regulatory requirements.

2. Cash Flow Management

Implication: Effective management of interbank transfers aids in optimizing cash flow.

  • Liquidity Management: Transferring funds between accounts allows a company to ensure that sufficient funds are available in the necessary accounts to cover expenses, investments, or operational needs. This helps in avoiding overdraft fees and maintaining adequate liquidity.
  • Interest Maximization: By strategically moving funds between accounts, a company can take advantage of accounts that offer higher interest rates, thereby maximizing interest income.

3. Operational Efficiency

Implication: Streamlined processes for interbank transfers improve operational efficiency.

  • Automated Transfers: Utilizing tools like the Cashbook Transfer Wizard in Sage Pastel Partner can automate and streamline the transfer process, reducing the likelihood of manual errors and saving time for the accounting staff.
  • Reduced Errors: Proper setup and use of interbank transfer accounts minimize the risk of errors, such as duplicate entries or incorrect amounts, which can complicate reconciliations and financial reporting.

4. Reconciliation

Implication: Regular interbank transfers necessitate diligent bank reconciliation practices.

  • Consistency: Ensuring that all interbank transfers are recorded accurately helps maintain consistency in bank reconciliations. This makes it easier to identify and resolve discrepancies between the bank statements and the company’s cash book.
  • Timeliness: Regular and timely reconciliation of interbank transfers ensures that any issues or errors are identified and corrected promptly, maintaining the integrity of financial records.

5. Internal Controls

Implication: Interbank transfers necessitate robust internal controls to prevent fraud and errors.

  • Authorization: Implementing approval workflows for interbank transfers can prevent unauthorized transfers, reducing the risk of fraud.
  • Segregation of Duties: Ensuring that different personnel are responsible for initiating, approving, and recording transfers helps in maintaining a system of checks and balances.

6. Budgeting and Forecasting

Implication: Accurate recording of interbank transfers supports effective budgeting and forecasting.

  • Cash Flow Projections: Understanding the movement of funds between accounts helps in creating more accurate cash flow projections. This aids in making informed decisions regarding future expenditures and investments.
  • Budget Adherence: Tracking interbank transfers helps ensure that actual cash flows align with budgeted figures, allowing for better financial control and management.

Conclusion

Interbank transfers, when properly managed and recorded, contribute significantly to the accuracy of financial reporting, the efficiency of cash flow management, and the overall operational efficiency of a company. Utilizing tools like Sage Pastel Partner’s Cashbook Transfer Wizard facilitates the accurate and efficient execution of these transfers. However, it is essential to maintain robust internal controls and regular reconciliation practices to fully realize the benefits and minimize potential risks associated with interbank transfers.

Contact Us

For questions, corrections, editorial feedback, partnership inquiries, or privacy requests, please use the current Contact page.

Current contact page: Contact Third Planner Studies.

About Us

Third Planner Studies publishes educational articles about accounting, tax, AI, technology, and small business operations.

Our current About page is available here: About Third Planner Studies.

Purchase Orders in QuickBooks Desktop | Step-by-Step Guide

Creating and Managing a Purchase Order 

In this tutorial, we’ll walk you through the process of creating a purchase order in QuickBooks to order additional inventory items. We’ll use a glass door as an example, which we’ve previously set up as an inventory part with one item on hand. We aim to order three more to ensure we have a total of four available for future use.

Step 1: Set Up Inventory Item

  1. Open QuickBooks.
  2. Navigate to the Item List by selecting Lists > Item List from the menu.
  3. Set Up the Inventory Item:
    • Click on “Item” at the bottom and select New.
    • Choose “Inventory Part” from the item type list.
    • Fill in the details:
      • Item Name/Number: Glass Door
      • Description: Detailed description if needed.
      • Cost: Set the cost, for example, $500.
      • Sales Price: Optional, set the price at which you sell the item.
      • COGS Account: Cost of Goods Sold.
      • Income Account: Sales of Product Income.
      • Asset Account: Inventory Asset.
      • On Hand: Set the current quantity, e.g., 1.
      • Reorder Point: Optional, set a reorder point if you want QuickBooks to alert you when stock is low.

Step 2: Create a Purchase Order

  1. Navigate to Purchase Orders:
    • Go to Vendors > Create Purchase Orders.
    • Alternatively, use the Purchase Orders icon on the home screen.
  2. Enter Vendor Information:
    • Vendor: Select Perry Windows and Doors from the dropdown list.
    • Class: Choose Remodel if it applies.
    • Ship To: Leave blank if shipping to your warehouse or select the client’s job site if applicable.
  3. Fill in Purchase Order Details:
    • Template: Use Custom Purchase Order Template.
    • Date: Default to current date or change as needed.
    • Purchase Order Number: Auto-generated, but you can change it if necessary.
  4. Add Items to the Purchase Order:
    • Item Column: Select Glass Door from the dropdown list.
    • Description: Enter any additional details, such as part number or special descriptions.
    • Quantity: Enter 3.
    • Rate: Default rate from the item setup ($500). Adjust if there’s a different price for this order.
    • Customer/Job: Leave blank if the items are for general inventory.

Step 3: Customize Purchase Order (Optional)

  1. Vendor Message and Memo:
    • Vendor Message: Add any specific instructions for the vendor.
    • Memo: Add internal notes for reference.
  2. Review and Total:
    • Total: QuickBooks automatically calculates the total (e.g., 3 x $500 = $1,500).

Step 4: Additional Options

  1. Main Tab:
    • Find: Search for existing purchase orders.
    • New: Create a new purchase order.
    • Save: Save the current purchase order.
    • Print: Print the purchase order.
    • Email: Email the purchase order to the vendor.
    • Attach File: Attach relevant documents.
    • Create Item Receipt: To be used when the items are received.
  2. Formatting Tab:
    • Spell Check: Ensure all text is correct.
    • Insert/Delete/Copy Line: Manage line items.
  3. Reports Tab:
    • Open Purchase Orders: View all open purchase orders.
    • Purchase Orders by Job/Item/Vendor: Detailed reports for better tracking.

Step 5: Save and Send Purchase Order

  1. Save the Purchase Order:
    • Click Save & Close or Save & New to save the purchase order.
  2. Send the Purchase Order:
    • Print: Print the order and send it physically.
    • Email: Send the order via email directly from QuickBooks.

Step 6: Receiving Items into Inventory

After creating the purchase order, you will need to receive the items once they arrive. This is done through the Receive Items feature in QuickBooks. We’ll cover this process in the next section of the tutorial.

By following these steps, you can efficiently create and manage purchase orders in QuickBooks, ensuring your inventory levels are maintained accurately and effectively.

Privacy Policy

The current Privacy Policy for Third Planner Studies is available here: Privacy Policy.

This website may use cookies, analytics, security tools, and advertising partners as described in the current policy.