Creating Sales Analysis Codes in Sage Pastel Partner

Creating Sales Analysis Codes in Sage Pastel Partner

In Sage Pastel Partner, creating sales analysis codes is essential for tracking the performance of sales representatives and calculating sales commissions accurately. This feature is particularly beneficial for manufacturing companies where field sales representatives play a crucial role in bringing in customers. By linking customers to specific sales representatives, companies can effectively monitor individual performance and incentivize sales efforts.

Step 1: Accessing Sales Analysis Codes

  1. Navigate to the “Edit” menu in Sage Pastel Partner.
  2. From the dropdown menu, select “Customers”.
  3. Then, click on “Sales Analysis Codes”.

Step 2: Creating Sales Analysis Codes

  1. In the Sales Analysis Codes window, you will see options to add, edit, or delete analysis codes.
  2. Click on “Add” to create a new sales analysis code.
  3. Enter a unique code or identifier for the sales analysis code. This could be the name or initials of the sales representative.
  4. Provide a description for the code to specify its purpose or the sales representative it represents

Step 3: Linking Customers to Sales Representatives

  1. Once the sales analysis code is created, you can start linking customers to their respective sales representatives.
  2. Open the customer record for the customer you want to link to a sales representative.
  3. In the customer details, there should be a field or option to assign a sales analysis code.
  4. Select the appropriate sales analysis code from the dropdown menu or list provided.
  5. Save the changes to the customer record.

Step 4: Tracking Performance and Calculating Commissions

  1. With customers linked to their respective sales representatives through sales analysis codes, you can now track the performance of each sales representative.
  2. Generate sales reports or use analytical tools within Sage Pastel Partner to analyze sales data based on the assigned sales analysis codes.
  3. Utilize the sales data to calculate commissions due to each sales representative accurately. The sales analysis codes provide a clear reference point for attributing sales and calculating commissions.

By setting up sales analysis codes in Sage Pastel Partner, manufacturing companies can effectively track the performance of their sales representatives and streamline commission calculations. This functionality enhances visibility into sales activities, promotes accountability among sales teams, and ultimately contributes to improved sales performance and profitability.

Linking customers to specific sales representatives in an accounting system like Pastel Partner is crucial for several reasons:

1. Personalized Customer Service

Assigning specific sales representatives to customers ensures that each customer receives personalized attention. This representative understands the customer’s history, preferences, and specific needs, leading to better service and satisfaction.

2. Accountability and Performance Tracking

It allows for effective tracking of sales representatives’ performance. By linking customers to representatives, businesses can monitor sales activities, measure performance metrics, and assess the effectiveness of individual sales strategies. This accountability can drive better performance and productivity among the sales team.

3. Enhanced Relationship Management

Sales representatives often build strong relationships with their customers. By maintaining consistent contact through the same representative, trust and rapport are established, leading to increased customer loyalty and retention.

4. Efficient Issue Resolution

When issues or queries arise, having a designated representative for each customer ensures that problems are addressed promptly and efficiently. The representative is familiar with the customer’s account and can provide quick solutions, improving overall customer satisfaction.

5. Accurate Sales and Commission Reporting

Linking customers to specific sales representatives allows for precise tracking of sales and commissions. It ensures that sales representatives are credited accurately for their efforts, which is critical for fair compensation and motivation.

6. Targeted Marketing and Sales Strategies

Sales representatives who are familiar with their customers can tailor marketing and sales strategies to meet the specific needs and preferences of their clientele. This targeted approach can lead to higher conversion rates and better sales outcomes.

7. Data Organization and Reporting

Organizing customer data by sales representative simplifies the reporting process. It provides clear and organized data that can be easily analyzed to make informed business decisions. This organization is essential for generating accurate sales forecasts and financial reports.

8. Improved Customer Insights

By maintaining detailed records of interactions between sales representatives and customers, businesses can gain valuable insights into customer behavior and preferences. This information can be used to refine product offerings and improve overall business strategies.

9. Streamlined Communication

With a dedicated point of contact, communication between the business and its customers becomes more streamlined. It reduces the chances of miscommunication and ensures that messages are conveyed accurately and promptly.

10. Compliance and Record-Keeping

Accurate records of which sales representative handles each customer are important for compliance and record-keeping. It ensures that all customer interactions are documented, which can be vital for legal and regulatory purposes.

In summary, linking customers to specific sales representatives in an accounting system like Pastel Partner enhances customer service, accountability, relationship management, issue resolution, and overall business efficiency. It is a fundamental practice that supports the strategic goals of a business and contributes to its long-term success.

4o

How to Process a Stock Take in Sage Pastel Accounting

In this guide, we will walk you through the steps to process a stock take in Sage Pastel Accounting. A stock take is essential to ensure that the theoretical quantities in Sage Pastel Accounting match the physical quantities you have on hand.

Pre-Stock Take Checklist

  1. Check Open Batches: Verify all open batches that affect inventory quantities, such as customer and supplier documents and inventory journals, to ensure that these unupdated documents and journals have not impacted your physical quantities on hand.
  2. Backup Data: Ensure you have a valid backup of your company data set, as a stock take cannot be reversed without a backup.

Step-by-Step Stock Take Process

  1. Initiate the Stock Take
    • Navigate to Process > Count Inventory.
    • A message will prompt you to rebuild the batch quantities. Click Yes.

Rebuild Batch Quantities

  • The Data Integrity Assistance screen will appear with the option to rebuild batch quantities selected.
  • Click Process. Once complete, click finish.

Snapshot of Inventory Quantities

  • The Count Inventory Assistance screen will display, advising you to take a snapshot of your inventory quantities.
  • Click Next to proceed.

  • Select Range of Items
    • Choose the range of items to include in the snapshot:
      • Multi-stores: If applicable, select the store range.
      • Arrange by: Inventory code, inventory category, bin number, or barcode.
    • For inventory code, bin number, or barcode, use the magnifying glass to select the range.
    • For inventory category, select the range from the drop-down lists.
    • To select all items, leave the From field blank and fill the To field with Zs.
  • Include Item Types
    • Choose to include all item types, serialized items only, or non-serialized items only. Select all item types if you do not use the Serial Number Tracker add-on module.
    • Click Next.

Operation Confirmation

  • Review your selections on the Operation Confirmation screen.
  • Click Back to change your selection, Cancel to exit, or Process to continue.

Process Snapshot

  • Confirm the message that items have been processed in the snapshot.
  • Click No to proceed to the next step.

Entering Physical Quantities

  1. Print or Create Count Sheets
    • You can print the count sheet from Sage Pastel Accounting or create your own.
  2. Enter or Edit Quantities
    • Enter or edit the physical quantities on hand.
    • You can also import a text or CSV file containing the physical quantities (refer to the document “Importing Inventory Quantities” for the necessary layout).
    • Choose to show items in the snapshot only or show all inventory items.
    • Click Next.
  3. Count Inventory Assistant
    • Enter the physical quantities for each item.
    • If using the Serial Number Tracker add-on module, ensure to match the serial numbers with the quantities.
    • Click Next to proceed to the printer variance report.

Printing and Reviewing Variance Report

  1. Printer Variance Report
    • Review the variance between theoretical and physical quantities.
    • Set filters for printing options, sorting inventory, and displaying various item details.
    • Click OK to view the report.

  1. Review Report
    • Ensure the physically counted quantities and variance are correct.
    • If discrepancies exist, clear the snapshot without updating inventory quantities and redo the count inventory process.

Finalizing Stock Take

  1. Update Differences
    • Update any differences between theoretical and physical quantities.
    • Clear the snapshot.

Select Period and Date

  • Select the period and date for processing the stock take.
  • Ensure the date falls within the correct period and click Next.

Summary of Actions

  • Review the summary and click Process to finalize.
  • Click Finish on the operation complete screen.

Verify Update

  • Go to View > Inventory Quantities.
  • Apply the appropriate filters to ensure the quantities have updated correctly.

Why is it Important to Take Regular Stock Counts

Taking regular stock counts is crucial for several reasons, especially for businesses that rely on accurate inventory management. Here are some key reasons why regular stock counts are important:

  1. Accuracy in Financial Reporting:
    • Regular stock counts ensure that the inventory values reported in financial statements are accurate. This is essential for correct profit calculation, tax reporting, and financial analysis.
  2. Inventory Control:
    • Regular counts help in maintaining optimal inventory levels, preventing overstocking or stockouts. This ensures that the business can meet customer demand without incurring unnecessary holding costs.
  3. Loss Prevention:
    • Frequent stock counts can help identify discrepancies caused by theft, damage, or loss. Early detection allows for timely action to mitigate further losses and implement better security measures.
  4. Operational Efficiency:
    • Knowing the exact inventory levels helps in planning and executing production schedules, purchasing, and sales strategies. This reduces downtime and increases overall operational efficiency.
  5. Improved Customer Satisfaction:
    • Accurate inventory levels ensure that customer orders can be fulfilled promptly. This leads to higher customer satisfaction and repeat business.
  6. Cost Management:
    • By maintaining accurate inventory records, businesses can better manage their costs, identify slow-moving items, and make informed decisions about discounting or discontinuing certain products.
  7. Supplier Relations:
    • Regular stock counts provide accurate data for negotiating with suppliers. This can lead to better terms, bulk purchase discounts, and improved delivery schedules.
  8. Regulatory Compliance:
    • In some industries, regulatory bodies require accurate and regular inventory reporting. Regular stock counts ensure compliance with such regulations and avoid potential fines or legal issues.
  9. Identifying Trends:
    • Regular inventory counts help identify trends in product demand, seasonal variations, and changes in consumer preferences. This data is valuable for strategic planning and marketing efforts.
  10. Enhanced Inventory Valuation:
    • Regular counts contribute to precise inventory valuation, which is important for asset management and insurance purposes. Accurate valuation reflects the true worth of the inventory held by the business.

In summary, regular stock counts are essential for maintaining accurate inventory records, which are vital for financial accuracy, operational efficiency, customer satisfaction, cost management, and overall business success.

Creating Customer Categories

Creating Customer Categories

In today’s article, we’ll explore how to create customer categories. In our previous piece, part of the customer accounts series, we discussed creating sales analysis codes, which we’ll link to customer accounts. Now, before creating customer accounts, we need to focus on creating customer categories.

Getting Started

  1. Navigate to Customer Categories:
    • Click on Edit when you go to Customers.
    • You will see options for Customer Accounts and Sales Analysis Codes. We have already covered sales analysis codes. Now, click on Customer Categories.

Enter Admin Password:

  • Upon clicking Customer Categories, a window prompting you to enter your admin password will appear. Enter the password and click OK.

Customer Categories Window:

  • The system will take you to the customer categories window. This interface is straightforward and user-friendly, allowing you to start creating your categories.

Defining Customer Categories

Customer categories can be defined based on various criteria, allowing businesses to better organize and analyze their customer base. Proper categorization helps tailor marketing efforts, improve customer service, and enhance sales strategies. Here are some examples of how customer categories can be defined:

Geographical Area

  • Local Customers:
    • These are customers within the same country or region as the business. For instance, a business based in New York might classify customers from within the United States as local customers.
    • Example: A bakery in Paris categorizes all customers from within France as local customers.
  • Export Customers:
    • These are customers located in different countries. Export customers often have different needs and logistical considerations compared to local customers.
    • Example: A tech company in the USA categorizes customers in Europe and Asia as export customers.

Pricing Structure

  • Retail Customers:
    • These are end-user customers who purchase products for personal use. Retail customers typically buy in smaller quantities compared to wholesale customers.
    • Example: Individuals buying electronics from a store for personal use.
  • Wholesale Customers:
    • Wholesale customers purchase products in bulk, often to resell. These customers usually get products at a discounted rate due to the volume of their purchases.
    • Example: A small business buying large quantities of stationery from a supplier to resell in their store.

Nature of the Customer

  • Individual Customers:
    • These are single consumers who purchase goods or services for personal consumption. They can include one-time buyers or repeat customers.
    • Example: A person buying groceries from a supermarket.
  • Corporate Customers:
    • These are businesses or organizations purchasing goods or services, often in larger quantities and with specific needs. Corporate customers might require customized solutions, bulk purchases, or regular supply contracts.
    • Example: A company purchasing office supplies in large quantities for its headquarters.
  • Retail Businesses:
    • Businesses that sell directly to consumers, either in physical stores or online. Retail business customers might purchase products to stock their shelves for resale.
    • Example: A clothing store buying apparel from a manufacturer.
  • Service Providers:
    • Companies that provide services rather than physical products. These can range from consulting firms to maintenance companies.
    • Example: A digital marketing agency purchasing software tools to enhance its service offerings.

Combining Criteria

Businesses can also combine multiple criteria to create more specific categories. For instance:

  • Local Retail Customers:
    • Individual consumers within the same region purchasing for personal use.
    • Example: Residents of a city buying from a local farmer’s market.
  • International Wholesale Customers:
    • Businesses located in other countries purchasing products in bulk for resale.
    • Example: A chain of bookstores in Europe buying large quantities of books from a US publisher.

By defining customer categories based on these criteria, businesses can better understand their customer base, tailor their strategies, and improve overall efficiency and effectiveness in their operations.

Creating the Categories
  1. Add Categories:
    • In the customer categories window, you can type in your categories. You have the flexibility to add as many categories as needed.
    • The system allows up to 99 categories. Simply scroll down to see the available slots.

Save Your Categories:

  • After entering the categories, click OK to save them.

Importance of Customer Categorization

Customer categorization is crucial for effective sales analysis. It helps you understand which customer categories generate the most revenue, allowing you to focus on improving or expanding specific categories.

Conclusion

This is how you create customer categories. We’ve covered sales analysis codes and customer categories, and next, we’ll move on to creating customer accounts.

Thank you for reading! Don’t forget to subscribe, like our article, share it on social media platforms like Facebook and WhatsApp, and leave your comments. Your support helps us continue providing valuable content for professionals and students in the accounting profession.

Creating User Profiles on Sage Pastel Partner

A Step-by-Step Guide

In this article, we’ll guide you through the process of creating user profiles in Sage Pastel Partner. Creating user profiles and controlling system rights in Sage Pastel Partner is essential for maintaining security, enhancing operational efficiency, ensuring compliance, preventing fraud, and providing a tailored user experience. These controls help protect the organization’s financial data and support a structured, accountable, and efficient working environment.

How to Create User Profiles in Sage Pastel Partner

Step 1: Access the User Setup

  1. Open Sage Pastel Partner.
  2. Navigate to the Setup menu.
  3. Select Users/Passwords.
  4. Click on Users.

Step 2: Enter Admin Password

  1. A prompt will appear asking for the admin password. Enter the admin password and click OK.

Step 3: User Setup Window

  1. You will now be in the Users Setup window.
  2. Ensure this is the only window open by closing other windows if necessary.
  3. The options available are Delete, Save, Reject, Search, and navigation buttons.

Step 4: Create a New User(Lets say a Cashbook Clerk)

  1. Click on Next to create a new user.
  2. The User Code will be automatically generated by the system.
  3. Fill in the following fields:
    • Username: Enter the user’s name (e.g., Susan Jack).
    • Email Address: Enter the user’s email address (e.g., jack@demo.com).
    • Password: Set a password for the user and confirm it.
    • User Group: Select Personalized.

Step 5: Set User Permissions

  1. Click on Menu Access to assign permissions.
  2. A window replicating the main menu will appear. Here, you can set specific rights for the user.

Step 6: Assign Rights by Menu

  1. File Menu: Uncheck all options as these are typically administrative functions.
  2. Edit Menu: Uncheck all options.
  3. Process Menu:
    • Uncheck all initially.
    • Check only the necessary tasks (e.g., Cash Book and Bank Reconciliation).
  4. View Menu:
    • Uncheck all initially.
    • Check relevant reports for the user’s role (e.g., Cash Movement Report under Financial Reports and Cashbook Details under Transactions).
  5. Change Menu: Uncheck all options.
  6. Setup Menu: Uncheck all options.
  7. Utility Menu:
    • Uncheck all initially.
    • Check relevant tools (e.g., Note Facility, Price Search, and Calculator).

Step 7: Save the User Profile

  1. Once all permissions are set, click OK.
  2. In the Users Setup window, click Save to save the new user profile.

Step 8: Log In as the New User

  1. Close the Users Setup window.
  2. Go to the File menu and click Open.
  3. Select your company file and click Open.
  4. Enter the new user’s password.
  5. Set up a security question and answer, then click OK.

Step 9: Verify User Permissions

  1. Log in as the new user (e.g., Susan Jack).
  2. Check the permissions:
    • Under File, the user should only have access to Open, Set Printer, and Exit.
    • Under Edit, there should be no options available.
    • Under Process, ensure only Cash Book and Bank Reconciliation are available.
    • Under View, verify access to Cash Movement and Cashbook Details reports.
    • Under Change and Setup, there should be no options available.
    • Under Utility, the user should only have access to Note Facility, Price Search, and Calculator.

Creating user profiles and controlling system rights in an accounting system like Sage Pastel Partner is crucial for several reasons:

1. Security and Data Integrity

  • Prevent Unauthorized Access: By creating user profiles and assigning specific permissions, you can ensure that only authorized personnel have access to sensitive financial data. This minimizes the risk of unauthorized access and potential data breaches.
  • Data Protection: Limiting access to certain functionalities helps protect the integrity of your accounting data, ensuring that only qualified personnel can modify critical financial records.

2. Accountability and Audit Trail

  • Traceability: User profiles enable tracking of actions performed by different users within the system. This is essential for creating an audit trail that can be used to investigate discrepancies or errors.
  • Responsibility: Assigning specific roles to users ensures that each person is accountable for their actions. This clarity helps in identifying who made changes or entries, thereby facilitating accountability.

3. Operational Efficiency

  • Role-Based Access: By granting access based on job roles, employees can quickly access the information and tools they need to perform their tasks efficiently without being overwhelmed by unnecessary functionalities.
  • Reduce Errors: Restricting access to certain functions reduces the likelihood of accidental errors by users who are not trained or authorized to perform specific tasks.

4. Compliance with Regulations

  • Regulatory Requirements: Many industries have strict regulatory requirements regarding financial data access and management. Implementing user profiles and access controls helps ensure compliance with these regulations, such as GDPR, SOX, or HIPAA.
  • Audit Readiness: Controlled access and detailed audit trails prepare your organization for external audits, demonstrating that you have robust controls in place to protect financial data.

5. Minimizing Internal Fraud

  • Segregation of Duties: Implementing user profiles allows for the segregation of duties, where different users are responsible for different parts of a process. This reduces the risk of internal fraud by ensuring that no single individual has control over all aspects of a financial transaction.
  • Detecting Suspicious Activities: With controlled access and monitoring, it is easier to detect and investigate suspicious activities, such as unauthorized data manipulation or unusual transactions.

6. Customizable User Experience

  • Tailored Access: Customizing the user experience by providing access to only relevant features and data enhances usability. Users can focus on their specific tasks without navigating through irrelevant options.
  • Training and Support: With user profiles tailored to specific roles, training can be more focused and effective, ensuring users are well-versed in the functionalities they need to use.

7. Improving System Performance

  • Resource Management: Limiting access to high-resource functions to only those who need them can help in managing system resources more efficiently, leading to better overall system performance.

Conclusion

In summary, creating user profiles and controlling system rights in Sage Pastel Partner is essential for maintaining security, enhancing operational efficiency, ensuring compliance, preventing fraud, and providing a tailored user experience. These controls help protect the organization’s financial data and support a structured, accountable, and efficient working environment.

Processing General Journal and General Ledger in Sage Pastel Partner

Introduction to General Ledger Transactions

To process general ledger transactions in Sage Pastel Partner, we use the ENTRY TYPE called “general journals.” The ENTRY TYPE represents the book of original entry. Whenever you hear “entry type,” remember it refers to the book of original entry.

Accessing the General Journal

  1. Click on Process: Navigate to the Process menu.
  2. Select Journals: From the dropdown, select Journals.
  3. Click on General Journal: This will open the General Journal window.

Before we dive into capturing general ledger transactions, let’s define some key terms.

What Are General Ledger Transactions?

General Journal transactions are defined as transactions that are not:

  1. Cashbook transactions
  2. Customers or Debtors transactions
  3. Suppliers or Creditors transactions

Defining Cashbook, Debtors, and Creditors Transactions

Cashbook Transactions: These include all transactions involving cash, bank, and electronic money (credit cards, ecocash, debit cards). If a transaction involves cash in any form, it is captured through the cashbook.

Debtors Transactions: These involve sales and returns of products and services to customers or debtors done on account (i.e., no cash involved). These are captured through the Customer Journal. If cash is involved, the transaction is captured through the cashbook instead.

Creditors Transactions: These involve purchases and returns of products and services from suppliers or creditors done on account. These are captured through the Suppliers Journal. If cash is involved, the transaction is captured through the cashbook instead.

Determining the Transaction Type

Before capturing a transaction, you must identify its type:

  • Is this a General Ledger transaction?
  • Is this a cashbook transaction?
  • Is this a Customers/Debtors transaction?
  • Is this a Suppliers/Creditors transaction?

Choose the appropriate entry type or book of original entry accordingly. This step is crucial.

Understanding the General Journal Window

The General Journal window consists of the following fields:

  • Entry Type: The name of the book of original entry (General Journal in this case).
  • Period: The month the transaction occurred.
  • Date: The date on which the transaction occurred.
  • Account: The general ledger account being debited or credited.
  • Reference: A code to trace the transaction.
  • Description: Describes the nature of the transaction.
  • Debit Column: Enter the amount if debiting the account.
  • Credit Column: Enter the amount if crediting the account.
  • Project: The cost center affected by the transaction.
  • Contra Account: The account that will be debited or credited based on the account column entry.

Buttons in the General Journal Window

  • Delete: Delete a line or the entire batch.
  • Insert: Insert a line in the batch.
  • Match: Not applicable here.
  • Inclusive/Exclusive: Not applicable here.
  • Preview: Preview transactions before updating.
  • Print: Print the batch.
  • Update: Post transactions to the general ledger, automatically updating the trial balance, income statement, and balance sheet.
  • Batch: Update batch settings.
  • Settings: Automate some batch processes, like incrementing reference numbers.

Capturing Transactions: Single Line vs. Double Line Processing

Single Line Processing

  1. Select Period: Choose the period.
  2. Enter Date: Input the transaction date.
  3. Choose Account: Select the account to be debited or credited.
  4. Enter Reference: Input the reference code.
  5. Enter Description: Describe the transaction.
  6. Enter Amount: In the debit or credit column.
  7. Enter Cost Center: Input the cost center.
  8. Enter Contra Account: Input the contra account.

Double Line Processing

  1. First Line (Debit Entry):
    • Select period.
    • Enter date.
    • Choose account.
    • Enter reference.
    • Enter description.
    • Enter amount in the debit column.
    • Enter cost center.
    • Leave contra account blank.
  2. Second Line (Credit Entry):
    • Select period.
    • Enter date.
    • Choose account.
    • Enter reference.
    • Enter description.
    • Enter amount in the credit column.
    • Enter cost center.
    • Leave contra account blank.

Example: Recording a Rent Transaction

Transaction: On 2 July 2019, rent amounting to $3,000 is owed to Sundry Supplier (Beta Bricks).

Steps to Capture the Transaction

  1. Define the Transaction:
    • Determine if it’s a General Ledger, cashbook, Debtors, or Creditors transaction. In this case, it is a General Ledger transaction.
  2. Identify Accounts:
    • Debit: Rent Expense Account
    • Credit: Rent Payable Account
  3. Choose Processing Method: Single line or double line.

Using Single Line Method

  1. Select period.
  2. Enter date.
  3. Enter Rent Expense Account (debit).
  4. Enter reference number.
  5. Enter description.
  6. Enter amount ($3,000) in the debit column.
  7. Enter cost center.
  8. Enter Rent Payable Account (contra account).
  9. Update.

Using Double Line Method

  1. First Line (Debit Entry):
    • Select period.
    • Enter date.
    • Enter Rent Expense Account.
    • Enter reference number.
    • Enter description.
    • Enter amount ($3,000) in the debit column.
    • Enter cost center.
    • Leave contra account blank.
  2. Second Line (Credit Entry):
    • Select period.
    • Enter date.
    • Enter Rent Payable Account.
    • Enter reference number.
    • Enter description.
    • Enter amount ($3,000) in the credit column.
    • Enter cost center.
    • Leave contra account blank.
  3. Update.

By following these steps, your trial balance, income statement, and balance sheet will be automatically updated in Sage Pastel Partner, streamlining your accounting processes.

Send and Receive Accountant Data Assistant

Overview of the Function

This tutorial will guide you through the steps required to send and receive data using the Accountant Data Assistant in Sage Pastel Partner. This function is essential for organizations that have internal accounts personnel, such as bookkeepers, who prepare initial financial records up to the trial balance, and external accountants who finalize the accounts, make corrections, and produce reports using the data compiled by the bookkeeper.

The Accountant Data Assistant allows:

  1. Sending a full backup of the company data.
  2. Restoring a full backup of the company data.
  3. Importing the GAAP Category Allocations and Journal Batches.

We will focus on the first two parts: sending and restoring a full backup of the company data.

Part 1: Sending a Full Backup of the Company Data

Step-by-Step Guide

  1. Access the Function
    • Click on File in the main menu.
    • Select Send and Receive Accountant Data Assistant.

Send a Full Backup of the Company Data

    • Click on Send a full backup of the company data.
    • You will see two methods to send the data:
      • Save to disk
      • Email to accountant

Method 1: Save to Disk

  1. Select Save to Disk
    • Choose Save to disk and click Next.

Select Drive

  • In the next window, select the drive where you want to save the backup file by clicking the drop-down arrow.
  • Click Next.

Confirm Operation

  • You will be taken to the confirm operation window. Read through the notes.
  • Click Process.

Operation Complete

  • The operation will run, and you will be taken to the operation complete window.
  • Click Finish.

Send Backup via Email

  • Use your normal email services to send the saved backup file as an attachment to the accountant.

Method 2: Email to Accountant

  1. Select Email to Accountant
    • Choose Email to accountant and click Next.
  2. Enter Email Details
    • Write in the email address of the receiver, the subject, and the body of the email.
    • Click Next.
  3. Confirm Operation
    • You will be taken to the confirm operation window. Read through the notes.
    • Click Process.
  4. Operation Complete
    • The operation will run, and you will be taken to the operation complete window.
    • Click Finish.

Using either method, you will have successfully sent a full backup of your company data.

Part 2: Restoring a Full Backup of the Company Data

Step-by-Step Guide

  1. Access the Function
    • Click on File in the main menu.
    • Select Send and Receive Accountant Data Assistant.
  2. Restore a Full Backup of the Company Data
    • Click on Restore a full backup of the company data.
    • Click Next.
  3. Select Drive with Backup Files
    • In the next window, select the drive with your received backup files by clicking the drop-down arrow.
    • The received backup files will appear in the window.
    • Select the file you want to restore and click Next.
  4. Confirm Operation
    • You will be taken to the confirm operation window. Read through the notes.
    • Click Process.
  5. Warning
    • A warning will appear stating that you are about to do a restore. Click OK.
  6. Operation Complete
    • The process will run, and once complete, click Finish.
  7. Log into Restored Company
    • You will be prompted to log into the restored company.
    • Enter your password and click OK.

You are now ready to work with the restored data.

Conclusion

By following these steps, you can effectively use the Send and Receive Accountant Data Assistant to manage your financial data exchange between the bookkeeper and the accountant. This ensures that your financial records are accurately maintained and finalized, facilitating smooth and efficient accounting processes within your organization.

Creating Customer Accounts in Sage Pastel Partner

A Step-by-Step Guide

In this article, we’ll walk you through the process of creating customer accounts in Sage Pastel Partner. Creating customer accounts on Sage Pastel Partner is essential for maintaining organized financial records, managing customer relationships effectively, and ensuring compliance with regulatory standards. It enables businesses to track transactions, manage credit, streamline operations, and make informed decisions based on accurate financial data.

Getting Started

To begin creating customer accounts, follow these steps:

  1. Navigate to the Customer Accounts Section:
    • Click on Edit.
    • Select Customers.
    • Choose Accounts.
    • The system will load the Edit Customer Accounts window.

Understanding the Edit Customer Accounts Window

In this window, you’ll find several buttons and fields essential for managing customer accounts:

  • Add/Edit/Delete Buttons:
    • Add: Create a new customer account.
    • Edit: Modify an existing customer account.
    • Delete: Remove a customer account (Note: Do not delete accounts with posted transactions).
    • Save: Save the details of a customer account.
    • Reject: Discard changes before saving.
    • Search: Find a customer by account code or name.
    • Navigation Buttons: Move to the first, last, previous, or next customer account in the list.
  • Account Code: Enter a unique code for the customer.
  • Description: Provide the customer’s name.
  • Customer Category: Select the appropriate category (e.g., Individual or Corporate).

Entering Customer Details

Let’s break down the process into manageable steps, starting with the Details tab.

  1. Details Tab:
    • Account Code: Enter a unique code (e.g., CA001).
    • Description: Enter the customer’s name (e.g., Makonde Enterprises Pvt Ltd).
    • Customer Category: Select the appropriate category (e.g., Corporate).
    • Postal Address: Enter the postal address (e.g., P.O. Box 2010, Harare Main Post Office, Harare).
    • Physical Address: Enter the physical address (e.g., 43A Steve Biko Drive, Masasa).
    • Contact Person: Enter the name of the contact person (e.g., Prospect Tama).
    • Phone Number: Enter the business phone number (e.g., 0242-123456).
    • Mobile Number: Enter the mobile number if available.
    • Email: Enter the business email address.
  2. Sales Representative:
    • Select the sales representative who handles this customer.
    • Use the code or description to find the representative.

Additional Tabs

Once you’ve filled out the Details tab, proceed with the following tabs:

  1. Processing Tab:
    • Currency: Select the home currency.
    • Processing Method: Choose Open Item to link payments to specific invoices, ensuring accurate age analysis reports.
  2. Terms Tab:
    • Adjust terms if necessary (e.g., credit limits, early payment terms).
  3. Additional Options Tab:
    • Usually, no changes are needed here.
  4. Balances Tab:
    • This tab shows transactions for the customer (empty for new customers).
  5. Notes Tab:
    • Add any notes relevant to the customer account.

Final Steps

  1. Save the Customer Account:
    • Once all details are entered, click on Save to create the customer account.
  2. Creating Another Account:
    • Click on Add to start creating another customer account.

Creating customer accounts in Sage Pastel Partner is crucial for several reasons:

  1. Transaction Tracking: Customer accounts allow you to track all transactions related to a specific customer in one place. This includes sales, payments, credits, and refunds. By organizing transactions within customer accounts, you can easily monitor customer activity and history.
  2. Accuracy in Financial Reporting: Customer accounts provide accurate data for financial reporting and analysis. With each transaction recorded against the respective customer account, you can generate detailed reports such as sales summaries, aging analysis, and customer statements. This level of detail ensures accurate financial reporting and helps in decision-making processes.
  3. Credit Management: Customer accounts help in managing credit terms and limits effectively. You can set credit limits for individual customers and monitor their outstanding balances. This helps in controlling credit risk and ensures timely payment collections.
  4. Customer Relationship Management (CRM): Maintaining customer accounts facilitates better customer relationship management. You can store contact information, preferences, and notes about individual customers, enabling personalized communication and service delivery. This strengthens customer relationships and fosters loyalty.
  5. Efficient Order Processing: Customer accounts streamline the order processing workflow. By associating each order with a specific customer account, you can easily process orders, generate invoices, and track deliveries. This enhances operational efficiency and reduces errors in order fulfillment.
  6. Compliance and Audit Trail: Customer accounts contribute to regulatory compliance and audit trail requirements. By accurately recording all customer-related transactions, Sage Pastel Partner helps in demonstrating compliance with accounting standards and regulatory requirements. Additionally, it provides an audit trail for internal and external audits, ensuring transparency and accountability.

In summary, creating customer accounts on Sage Pastel Partner is essential for maintaining organized financial records, managing customer relationships effectively, and ensuring compliance with regulatory standards. It enables businesses to track transactions, manage credit, streamline operations, and make informed decisions based on accurate financial data.

QuickBooks Desktop Law Firm Company File Setup

A Step-by-Step Guide

QuickBooks Desktop is a robust accounting software that can handle the financial needs of a law firm, including managing client trust accounts. Proper setup and consistent data entry are crucial for its effective use. This tutorial will guide you through the process of setting up a company file in QuickBooks Desktop, which is the first step to managing your law firm’s accounting.

Step 1: Launch QuickBooks Desktop

  • Locate QuickBooks Desktop: Double-click the QuickBooks Desktop icon on your computer desktop or navigate through the programs file to find it.
  • Open the Program: Once located, double-click to open QuickBooks Desktop.

Step 2: Create a New Company File

  • Click on File: In the QuickBooks menu, click on the “File” option.
  • Select New Company: From the dropdown menu, select “New Company.”

Step 3: Set Up Your Company

  • Get Your Business Set Up Quickly Window: This window presents four options for creating your company file:
    • Express Start: Quick setup with basic questions.
    • Detailed Start: Comprehensive setup with an interview process (this is the option we’ll use).
    • Create from an Existing Company File: Useful if converting from another QuickBooks file.
    • Convert from Another Accounting Software: For users switching from other accounting software.

Using Detailed Start

  • Select Detailed Start: Click on “Detailed Start” to begin the easy step interview process.

Step 4: Easy Step Interview

  • Company Information: Enter the following details:
    • Company Name: Enter your law firm’s name (e.g. Antwan Attorneys At Law).
    • Legal Name: If different from the company name, enter the legal name. If the same, repeat the company name.
    • Street Address: Input your firm’s address (e.g., 42 Palmer Road, Milton Park, Harare).
    • City, Zip Code, Country: Provide location details.
    • Phone Number: Enter your firm’s contact number.
    • Email and Website Address: Input if available.
  • Click Next: Proceed to the next step.

Step 5: Select Your Industry

  • Industry Selection: Choose “Legal Services” from the list provided.
  • Click Next: Continue to the next step.

Step 6: Company Organization

  • Choose Business Structure: Select the appropriate option (e.g., Sole Proprietorship, Partnership, LLC, Corporation).
  • Click Next: Move to the next step.

Step 7: Fiscal Year Setup

  • Select First Month of Fiscal Year: For Zimbabwe, the fiscal year typically runs from January to December. Select January.
  • Click Next: Continue.

Step 8: Set Up Administrator Password

  • Enter Password: Create an administrator password for security.
  • Retype Password: Confirm the password.
  • Click Next: Proceed to the next step.

Step 9: Create Your Company File

  • Create Company File: Click “Next” to begin creating your company file.
  • Save File: Choose a location to save your company file and click “Save.”

Step 10: Customize QuickBooks for Your Business

  • Customize QuickBooks Window: Click “Next” to start customizing QuickBooks.
  • Answer Business-Specific Questions: Enable features that suit your law firm’s needs by answering the following questions:
    • Business Type: Select “Services Only” since it’s a law firm.
    • VAT or Sales Tax: Select “Yes” if registered for sales tax.
    • Estimates/Quotations: Choose “Yes” if you create estimates.
    • Billing Statements: Choose “Yes” to send billing statements to clients.
    • Progress Invoicing: Select “No” (mostly used by contractors).
    • Manage Bills: Select “Yes” if you manage bills.
    • Track Time: Select “Yes” to track time spent on client projects.
    • Employees: Select “No” if not using the payroll module in QuickBooks.
    • Chart of Accounts Setup: Click “Next” to set up your chart of accounts.

Step 11: Set Tracking Start Date

  • Select Start Date: Choose the beginning of the fiscal year as the start date.
  • Click Next: Proceed to the next step.

Step 12: Chart of Accounts

  • Tick Relevant Accounts: Review and select the necessary accounts for your law firm.
  • Click Next: Continue to the next step.

Step 13: Complete Setup

  • Congratulations Window: You will see a message indicating the successful creation of your company file.
  • Click Go to Setup: Proceed to the next window.

Step 14: Initial QuickBooks Customization

  • Get All Details into QuickBooks: Options to add customers, suppliers, products/services, and bank accounts will appear.
  • Click Start Working: You can add these details later.

Final Step: Ready to Use QuickBooks

  • Begin Using QuickBooks: You are now ready to manage your law firm’s accounting in QuickBooks Desktop.

By following these steps, you will have a fully set up QuickBooks company file tailored to your law firm’s specific needs. Consistent and accurate data entry will ensure that your firm’s financial activities are well-managed and easily accessible.

Properly setting up the law firm’s company file in QuickBooks Desktop is crucial for several reasons:

  1. Accurate Financial Tracking: A correctly configured company file ensures all financial transactions are accurately recorded, making it easier to track income, expenses, and overall financial health.
  2. Client Trust Account Management: Law firms often handle client trust accounts, which require meticulous tracking to ensure compliance with legal and ethical standards. Proper setup allows for accurate management of these funds.
  3. Compliance and Reporting: Accurate financial records are essential for tax reporting and compliance with legal requirements. Proper setup helps generate precise financial reports needed for audits, tax filings, and regulatory compliance.
  4. Efficient Operations: A well-organized company file streamlines daily operations, such as invoicing, billing, and managing accounts payable and receivable, which enhances productivity and reduces errors.
  5. Informed Decision-Making: Detailed financial data enables better decision-making regarding budgeting, forecasting, and strategic planning, contributing to the firm’s growth and stability.
  6. Customization: Tailoring the QuickBooks setup to the specific needs of a law firm, such as selecting the right chart of accounts and enabling relevant features, ensures the software meets the firm’s unique operational requirements.

By setting up the company file properly, a law firm can maintain accurate financial records, ensure compliance, and optimize its financial management processes.

Restoring Company Data in Sage Pastel Partner

Prerequisites

Before you begin, ensure you have a recent backup of your company data. Without a backup, data restoration will not be possible.

This process is crucial after experiencing data corruption or a mishap with your computer. Here’s a step-by-step guide to help you through the data restore process.

Step-by-Step Guide to Restoring Company Data

  1. Access the Restore Function:
    • Open Sage Pastel Partner.
    • Navigate to the File menu.
    • Click on Restore. This will open the file restore window.

Select Backup Location:

  • In the file restore window, you will see an option labeled Where to Restore From.
  • Click on the dropdown arrow next to this option and select the drive where your backup is stored. For this tutorial, we’ll select drive F:, as that’s where our backup is located.

Choose the Backup File:

  • After selecting the drive, a list of available backups will appear.
  • Select the backup file you wish to restore.

Initiate the Restore Process:

  • Click on the Process button.
  • A warning message will appear, notifying you that you are about to replace the current company data with the data from the backup. Confirm this action by clicking OK.

Wait for the Restore to Complete:

  • The restore process will commence. The duration will depend on the size of the backup file. This might take a few seconds to complete.

Log into the Restored Company:

  • Once the restore process is finished, you will be prompted to log into the company.
  • Enter your password to access the restored company data.

That completes our lesson on restoring company data in Sage Pastel Partner. Following these steps ensures that you can quickly recover from data issues and resume your business operations smoothly.

Thank you for following along, and we hope this tutorial was helpful.

Setting Up Cost Centres and Revenue Centres Using the Projects Function

Setting Up Cost Centres and Revenue Centres

Sage Pastel Partner provides a useful way to track and analyze cost centres and revenue centres through the Projects function. This feature allows businesses to allocate costs and revenues to specific parts of the business without expanding the general ledger. Below is a detailed tutorial on how to set up cost centres or revenue centres in Sage Pastel Partner using the Projects function.

Step-by-Step Guide

  1. Open Sage Pastel Partner:
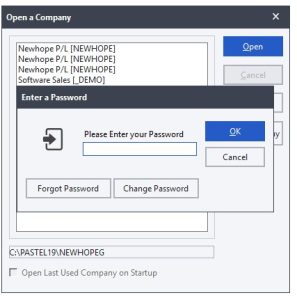
    • Launch Sage Pastel Partner on your computer.
    • Log in with your credentials.
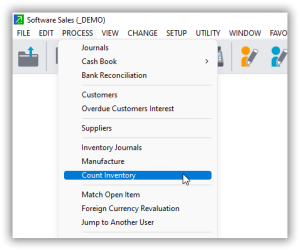
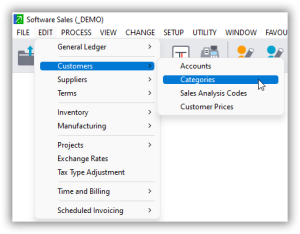
  2. Access the Projects Function:
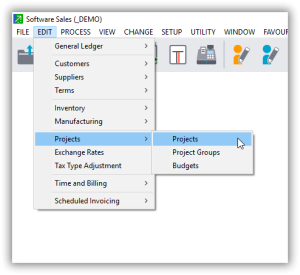
    • From the main menu, navigate to the Edit menu.
    • Select Projects from the dropdown list.

  1. Create a New Project (Cost Centre or Revenue Centre):
    • Click on the Add button to create a new project.
    • A new window will appear for project details.

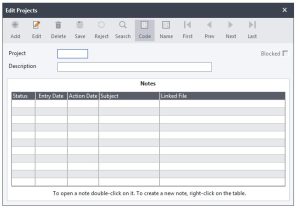
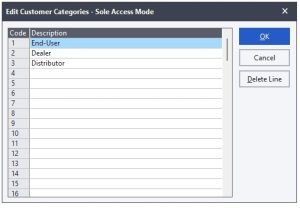
  1. Enter Project Details:
    • Project Code: Enter a unique code for the cost centre or revenue centre.
    • Project Description: Provide a descriptive name for the project (e.g., Marketing Department, Sales Division).
    • Start Date and End Date: If applicable, enter the start and end dates for the project. These fields can be left blank if the project is ongoing.
    • Status: Set the status of the project (e.g., Active, Inactive).
  2. Save the Project:
    • After entering all the necessary details, click on the Save button to store the project.
  3. Repeat for Additional Cost/Revenue Centres:
    • Repeat steps 3 to 5 for each cost centre or revenue centre you need to create.
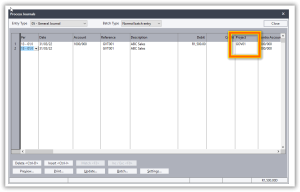
  4. Assigning Transactions to Projects:
    • When entering transactions in Sage Pastel Partner, you can allocate them to the appropriate project (cost centre or revenue centre).
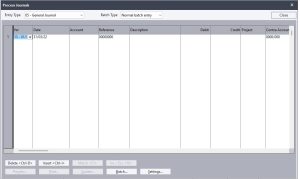
    • In the transaction entry screen (e.g., journal entries, supplier invoices), you will see a field for Project Code.
    • Select the relevant project code from the dropdown list to allocate the transaction to the appropriate cost centre or revenue centre.
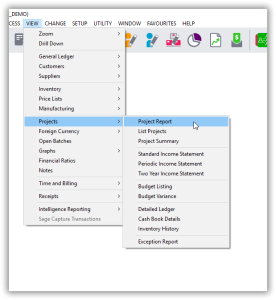
  5. Reporting and Analysis:
    • To analyze the data for specific cost centres or revenue centres, navigate to the View menu.
    • Select Reports and choose the the project report you need (e.g., Income Statement, Expense Report).
    • Filter the report by project code to see the financial data specific to each cost centre or revenue centre.

Tips for Using Projects as Cost/Revenue Centres

  • Flexibility: You can start and stop using projects at any time without affecting the general ledger.
  • Optional Use: Projects are optional for each transaction, allowing you to use them only when needed.
  • Detailed Analysis: Use project codes to gain insights into specific areas of your business, helping you make informed financial decisions.

By following these steps, you can effectively set up and manage cost centres and revenue centres in Sage Pastel Partner, enabling better financial tracking and analysis within your business.

Usefulness of Projects Function in Sage Pastel Partner

The Projects function in Sage Pastel Partner is a powerful tool for businesses to track and analyze financial data related to specific cost centres and revenue centres. Here’s an in-depth look at how this functionality can benefit your business:

1. Enhanced Financial Analysis

By using projects, businesses can gain detailed insights into the performance of specific areas within the organization. This allows for more precise tracking of income and expenses associated with particular departments, activities, or initiatives. For example, a business can track the profitability of its marketing campaigns, sales divisions, or specific customer projects.

2. Improved Budget Management

Projects enable businesses to allocate budgets to specific cost centres or revenue centres. This makes it easier to monitor actual spending against budgeted amounts, ensuring that resources are used efficiently and financial targets are met.

3. Flexibility and Control

  • Non-Disruptive: Projects do not increase the size of the general ledger, maintaining its simplicity and manageability.
  • Optional Usage: Businesses are not required to use projects for every transaction. This means you can selectively apply them to relevant transactions without complicating routine accounting processes.
  • Dynamic: Projects can be started and stopped at any time, providing flexibility to adapt to changing business needs without long-term commitments or extensive adjustments to the accounting system.

4. Detailed Reporting

Projects allow for detailed and specific reporting. Businesses can generate reports that focus on particular projects, providing insights into financial performance at a granular level. This is particularly useful for:

  • Cost Analysis: Identifying and controlling costs within specific areas.
  • Revenue Tracking: Monitoring revenue streams from distinct activities or segments.
  • Performance Measurement: Evaluating the success and ROI of various projects or departments.

5. Strategic Decision Making

With the ability to track financial data at a detailed level, management can make more informed decisions. This includes:

  • Resource Allocation: Determining where to allocate resources for maximum impact.
  • Identifying Trends: Recognizing trends and patterns within specific areas of the business.
  • Corrective Actions: Taking corrective actions in areas where performance is not meeting expectations.

6. Simplified Accounting

Using the Projects function simplifies accounting processes by segregating financial data without complicating the general ledger. This makes it easier for accountants and financial managers to:

  • Organize Data: Keep financial data organized and easily accessible.
  • Reduce Errors: Minimize the risk of errors by clearly defining financial transactions associated with specific projects.

7. Compliance and Accountability

Projects help in maintaining compliance and accountability within the organization. By tracking expenses and revenues against specific cost centres or revenue centres, businesses can ensure that funds are used appropriately and within approved limits. This is particularly important for organizations that need to adhere to strict financial regulations or internal policies.

8. Support for Project-Based Work

For businesses that operate on a project basis, such as construction firms, consulting agencies, or marketing companies, the Projects function is indispensable. It provides a clear structure for tracking project-specific financials, ensuring that each project’s profitability and performance can be accurately measured.

Conclusion

The Projects function in Sage Pastel Partner offers significant advantages for businesses looking to enhance their financial tracking and analysis capabilities. By leveraging this feature, businesses can achieve greater financial control, more detailed insights, and improved decision-making, ultimately leading to better overall financial health and performance.